OkHttp源码解析-(上)
文章目录
一直都知道Retrofit-OkHttp-Okio是Square公司封装的用于网络请求的大杀器,项目中也往往都在用Retrofit,看过我之前的文章的朋友应该看到过我的Retrofit源码解析系列, 但是一直没空往下继续深入,去解析OkHttp和Okio,毕竟Retrofit2.0本身就是搭建于OkHttp之上的。
老规矩,先讲一下这个库如何用,最后渐渐的一步步走到这个库的处理过程。
如何使用OkHttp
官方文档很详细的解释了如何使用OkHttp,我们只要一步步跟着就可以了。至于OkHttp优点,或者说为什么使用OkHttp我在这里就略过不提,相信你在看源码的过程中会有自己的理解。
大家在平常的http请求中,最常见的就是使用GET和POST请求,所以,官方Demo也就主要描述了如何处理这两种请求。
final OkHttpClient client = new OkHttpClient();

String get(String url) throws IOException {
  Request request = new Request.Builder()
      .url(url)
      .build();

  Response response = client.newCall(request).execute();
  return response.body().string();
}

public static final MediaType JSON
    = MediaType.parse("application/json; charset=utf-8");

String post(String url, String json) throws IOException {
  RequestBody body = RequestBody.create(JSON, json);
  Request request = new Request.Builder()
      .url(url)
      .post(body)
      .build();
  Response response = client.newCall(request).execute();
  return response.body().string();
}
这里可以看出,想要完成一次请求需要以下几个过程:
1. 构造OkHttpClient对象
2. 创建Request
3. 调用OkHttpClient对象的newCall()方法构造Call对象
4. 调用Call对象的execute()方法获取Response
OkHttp 整体调用流程
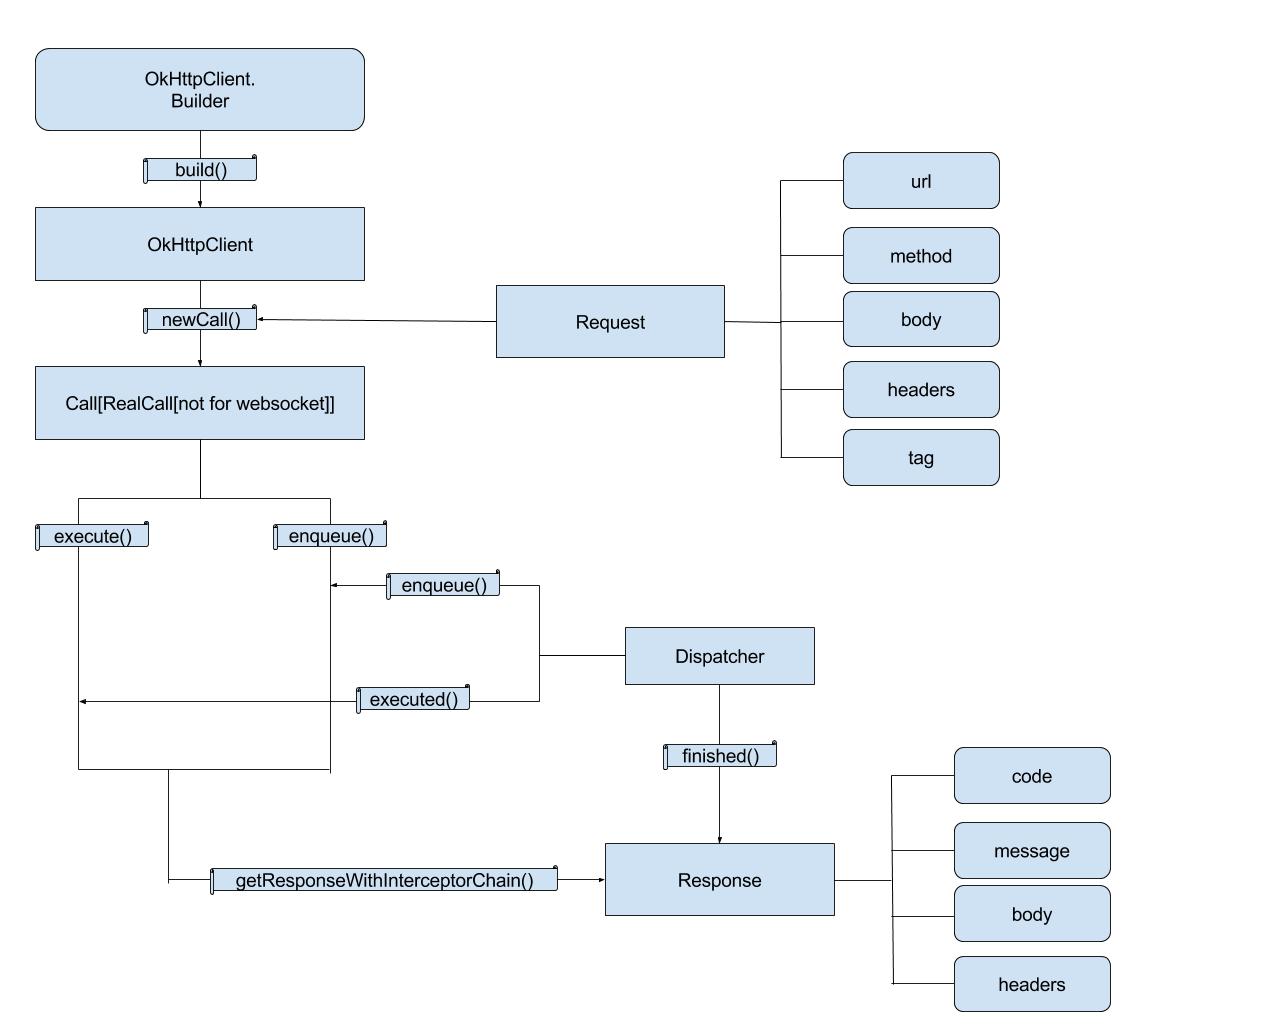
这次先看图,有了图,跟代码的时候才不会在代码中迷失。
OkHttp源码解读
OkHttpClient对象
参考流程图,我们先需要一个OkHttpClient对象,这个对象需要许多参数,所以用建造者模式构建,当然,每个参数都提供了默认值,也可以直接用OkHttpClient的构造函数来使用默认的实现。
这是各个参数的默认值,需要修改的通过Builder直接修改即可。
public Builder() {
  dispatcher = new Dispatcher();
  protocols = DEFAULT_PROTOCOLS;
  connectionSpecs = DEFAULT_CONNECTION_SPECS;
  proxySelector = ProxySelector.getDefault();
  cookieJar = CookieJar.NO_COOKIES;
  socketFactory = SocketFactory.getDefault();
  hostnameVerifier = OkHostnameVerifier.INSTANCE;
  certificatePinner = CertificatePinner.DEFAULT;
  proxyAuthenticator = Authenticator.NONE;
  authenticator = Authenticator.NONE;
  connectionPool = new ConnectionPool();
  dns = Dns.SYSTEM;
  followSslRedirects = true;
  followRedirects = true;
  retryOnConnectionFailure = true;
  connectTimeout = 10_000;
  readTimeout = 10_000;
  writeTimeout = 10_000;
  pingInterval = 0;
}
Call对象
接下来就需要发请求了,发请求需要一个Call对象, 我们通过newCall()方法获取这个对象。
@Override public Call newCall(Request request) {
  return new RealCall(this, request, false /* for web socket */);
}
可以看出,真正调用的Call实现类是RealCall这个类,默认情况下,这个RealCall对象的forWebSocket属性为false。
执行请求
构造完Call对象,通过Call对象的execute()方法同步的执行请求或者enqueue()方法异步的执行请求。
这里看一下图,会感觉图中的线在这里很密集,而且Dispatcher对象的线会指给这么多的方法,等我们进入源码中,就可以仔细了解了。
RealCall execute()
@Override public Response execute() throws IOException {
  synchronized (this) {
    if (executed) throw new IllegalStateException("Already Executed");
    executed = true;
  }
  captureCallStackTrace();
  try {
    client.dispatcher().executed(this);
    Response result = getResponseWithInterceptorChain();
    if (result == null) throw new IOException("Canceled");
    return result;
  } finally {
    client.dispatcher().finished(this);
  }
}
RealCall enqueue()
@Override public void enqueue(Callback responseCallback) {
  synchronized (this) {
    if (executed) throw new IllegalStateException("Already Executed");
    executed = true;
  }
  captureCallStackTrace();
  client.dispatcher().enqueue(new AsyncCall(responseCallback));
}
可以看到,这里面的方法都会调用Dispatcher对象的方法,所以,图中从Dispatcher对象中发出3条线,代表对应方法执行过程中调用Dispatcher对象的方法。
虽然Dispatcher对象在同步和异步的请求中都有它身影的出现,
但是,它主要作用是在异步请求中,开线程池执行异步请求,并用队列保持准备执行的请求。
Dispatcher enqueue()
synchronized void enqueue(AsyncCall call) {
  if (runningAsyncCalls.size() < maxRequests && runningCallsForHost(call) < maxRequestsPerHost) {
    runningAsyncCalls.add(call);  // runningAsyncCalls是一个队列
    executorService().execute(call); // executorService是一个线程池
  } else {
    readyAsyncCalls.add(call); // readyAsyncCalls是一个队列
  }
}
在同步请求中,它的作用是保存当前正在执行的请求,那么为什么要进行这样一个操作呢?
Dispatcher executed()
synchronized void executed(RealCall call) {
  runningSyncCalls.add(call); // runningSyncCalls是一个队列
}
查看Dispatcher对象的方法,发现有个cancelAll()方法,原来给用户提供了取消所有请求的操作,那么当前执行的同步请求依旧是要被cancel的,所以,自然要把当前正在执行的同步请求加入其中了。
Dispatcher cancelAll()
public synchronized void cancelAll() {
  for (AsyncCall call : readyAsyncCalls) {
    call.get().cancel();
  }

  for (AsyncCall call : runningAsyncCalls) {
    call.get().cancel();
  }

  for (RealCall call : runningSyncCalls) {
    call.cancel();
  }
}
最后获取到Response对象的时候,通知Dispatcher请求结束了,Dispatcher就会在队列里移除相应的请求,所以图中Dispatcher对象还有一条线指向Response对象。
重新回到RealCall对象,发现无论同步还是异步请求,获取Response的方式都是通过
Response response = getResponseWithInterceptorChain();
这样获取的。
我们通过这个方法就获取了Response对象,说明这个方法为我们做了真正发请求的工作,那么我们先看一张图,看这么复杂的工作,这个方法是如何实现的。
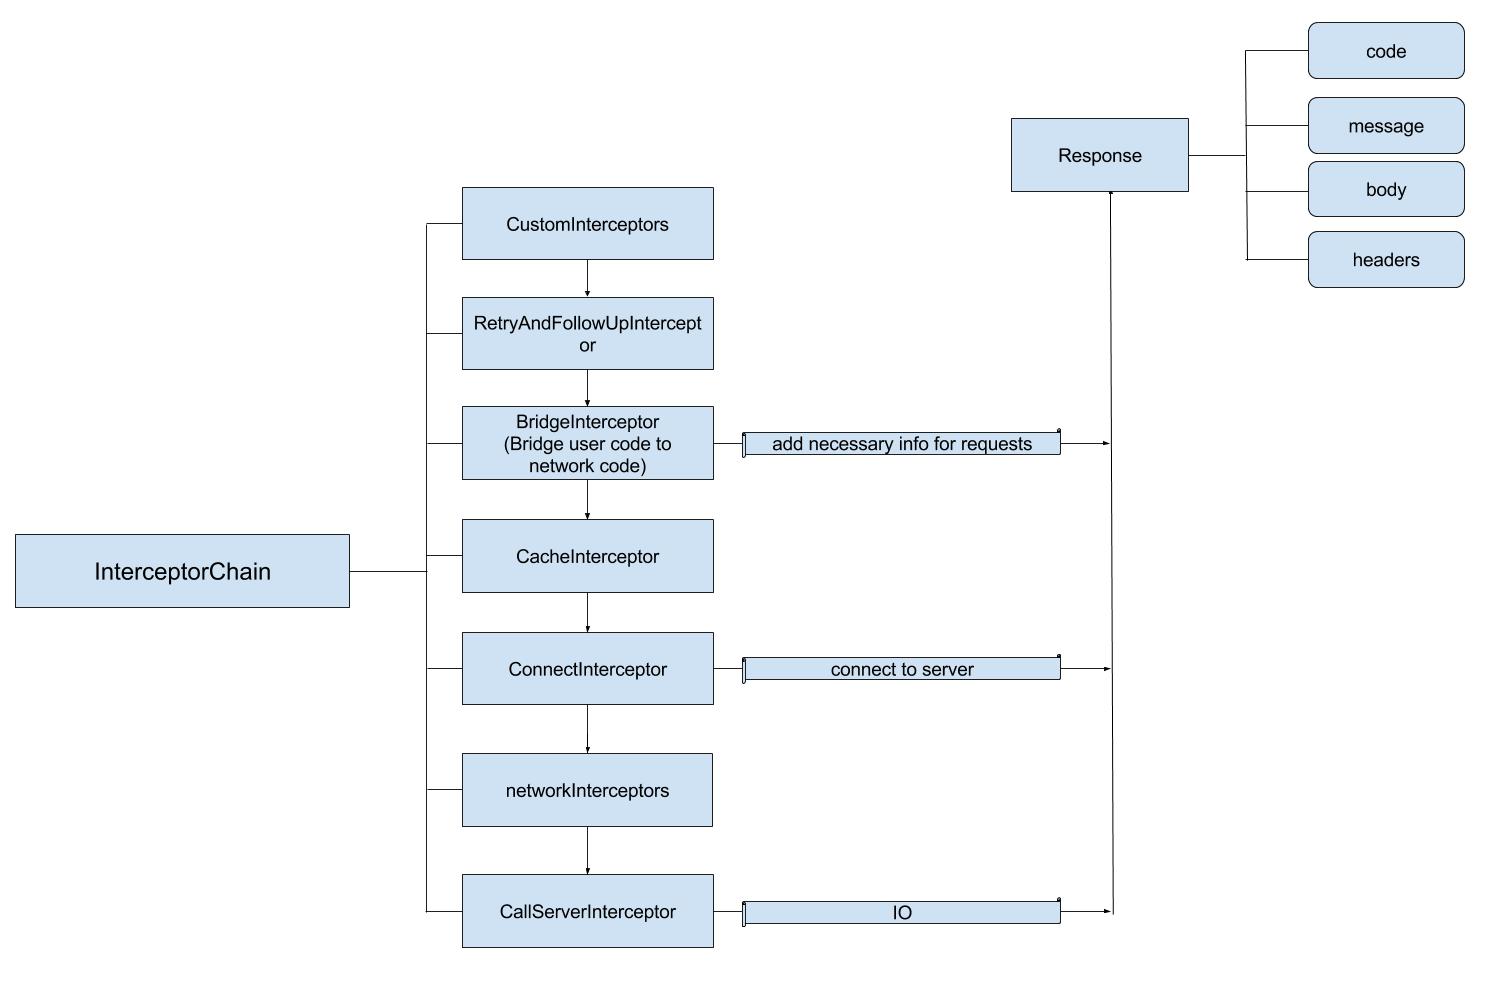
从图中可以看到,这个执行过程像链条一样一环套一环,如果熟悉设计模式,这不就是很好的责任链模式嘛。好了,我们看一下它这里具体做了什么。
RealCall getResponseWithInterceptorChain()
Response getResponseWithInterceptorChain() throws IOException {
  // Build a full stack of interceptors.
  List<Interceptor> interceptors = new ArrayList<>();
  interceptors.addAll(client.interceptors());
  interceptors.add(retryAndFollowUpInterceptor);
  interceptors.add(new BridgeInterceptor(client.cookieJar()));
  interceptors.add(new CacheInterceptor(client.internalCache()));
  interceptors.add(new ConnectInterceptor(client));
  if (!forWebSocket) {
    interceptors.addAll(client.networkInterceptors());
  }
  interceptors.add(new CallServerInterceptor(forWebSocket));

  Interceptor.Chain chain = new RealInterceptorChain(
      interceptors, null, null, null, 0, originalRequest);
  return chain.proceed(originalRequest);
}
可以看到,这其中有下面几种拦截器进行操作。
- 在配置 OkHttpClient 时设置的 interceptors;
- 负责失败重试以及重定向的 RetryAndFollowUpInterceptor;
- 负责把用户构造的请求转换为发送到服务器的请求、把服务器返回的响应转换为用户友好的响应的 BridgeInterceptor; 4.负责读取缓存直接返回、更新缓存的 CacheInterceptor;
- 负责和服务器建立连接的 ConnectInterceptor;
- 配置 OkHttpClient 时设置的 networkInterceptors;
- 负责向服务器发送请求数据、从服务器读取响应数据的 CallServerInterceptor。
可以看到,这个方法最终执行的是RealInterceptorChain对象的process()方法。
public Response proceed(Request request, StreamAllocation streamAllocation, HttpCodec httpCodec,
    Connection connection) throws IOException {
  if (index >= interceptors.size()) throw new AssertionError();

  calls++;

  // If we already have a stream, confirm that the incoming request will use it.
  if (this.httpCodec != null && !sameConnection(request.url())) {
    throw new IllegalStateException("network interceptor " + interceptors.get(index - 1)
        + " must retain the same host and port");
  }

  // If we already have a stream, confirm that this is the only call to chain.proceed().
  if (this.httpCodec != null && calls > 1) {
    throw new IllegalStateException("network interceptor " + interceptors.get(index - 1)
        + " must call proceed() exactly once");
  }

  // Call the next interceptor in the chain.
  RealInterceptorChain next = new RealInterceptorChain(
      interceptors, streamAllocation, httpCodec, connection, index + 1, request);
  Interceptor interceptor = interceptors.get(index);
  Response response = interceptor.intercept(next);

  // Confirm that the next interceptor made its required call to chain.proceed().
  if (httpCodec != null && index + 1 < interceptors.size() && next.calls != 1) {
    throw new IllegalStateException("network interceptor " + interceptor
        + " must call proceed() exactly once");
  }

  // Confirm that the intercepted response isn't null.
  if (response == null) {
    throw new NullPointerException("interceptor " + interceptor + " returned null");
  }

  return response;
}
如果不关心异常状况,核心代码就是如下几行:
 // Call the next interceptor in the chain.
RealInterceptorChain next = new RealInterceptorChain(
    interceptors, streamAllocation, httpCodec, connection, index + 1, request);
Interceptor interceptor = interceptors.get(index);
Response response = interceptor.intercept(next);
在process()的过程中,做了如下几个操作:
1. 生成新的RealInterceptorChain对象
2. 按index获取当前interceptors列表中Interceptor对象
3. 调用Interceptor对象的intercept()方法,并将新的RealInterceptorChain传给Interceptor对象。
这样,只要Interceptor对象在intercept()方法执行过程中调用Chain对象的proceed()方法,就会调用传给Interceptor对象的下一个RealInterceptorChain对象的proceed()方法。这样,就像上面说的,一条链一样的不停调用。
好了,上半部分的分析暂时就到这里了,下半部分对各个Interceptor进行分析。
参考: 拆轮子系列:拆 OkHttp