Retrofit-1.9源码分析-(下)
文章目录
看过上一篇的分析,并思考了我在最后留给大家的对那个方法的思考之后,我们就可以继续解析这个库了。
记得上一篇提到的小尾巴吗?这里我们先不谈这个小尾巴,先从 Demo 里接口里面的定义开始谈。
注解
public interface GitHubService {
    //被注释的内容是同步方法,在Android 4.0以后不允许主线程进行网络请求,所以一般不这么用
    //@GET("/users/{user}/repos")
    //List<Repo> listRepos(@Path("user") String user);
    @GET("/users/{user}/repos")
    void listRepos(@Path("user") String user, Callback<List<Repo>> callback);
}
在这里我们看到使用注解定义进行 http 请求时所需要的各种信息,比如相对 url,参数等等。
那我们就先观察一下注解。这里使用了@GET注解,表示 HTTP 中的 GET 方法,
GET
/** Make a GET request to a REST path relative to base URL. */
@Documented
@Target(METHOD)
@Retention(RUNTIME)
@RestMethod("GET")
public @interface GET {
  String value();
}
注解基础就不在这里讲了,这个@GET注解又被@RestMethod注解注解了,我们来看一下。
RestMethod
@Documented
@Target(ANNOTATION_TYPE)
@Retention(RUNTIME)
public @interface RestMethod {
  String value();
  boolean hasBody() default false;
}
这是注解注解的注解,也就是所谓的元注解。所有被这个注解注解的注解都可以被认为是该类型, 可以当作所有子类都可以被转换为父类。
被这个元注解注解的注解有这么几个, @GET, @POST, @PUT, @PATCH, @DELETE, @DELETE,
可以看出,这就是进行 HTTP 请求的几种常用的请求方式。
在示例中出现的其他注解先放一下。有了注解,那要实现这些注解的解析方式,这个实现在RestMethodInfo.java中
这里有两个重要方法来处理自定义的注解:
第一种是用在方法上的注解,如@GET,由parseMethodAnnotations()方法实现,
第二种是用在参数内的注解,如@PATH,由parseParameters()实现,
在这两个方法中,你可以知道哪些注解可以用在方法上,哪些注解可以用在参数内。
好了,到这里,我们终于可以返回上一篇最后留下的坑继续看了。
return (T) Proxy.newProxyInstance(service.getClassLoader(),
    new Class<?>[] { service },
    new RestHandler(getMethodInfoCache(service)));
完成接口代理的创建
最终,RestHandler实现了InvocationHandler,对接口中的方法进行加工。
看名字应该也很容易理解,getMethodInfoCache()的意义就是从传入的接口中获取对应的相关方法的缓存,
用户定义的接口中每个Method都要和RestMethodInfo对应,自然想到使用Map做它们关系的联结。
RestHandler持有对应的Map。
来看一下InvocationHandler接口中必须实现的唯一的方法:
RestHandler.invoke()
@SuppressWarnings("unchecked") //
@Override public Object invoke(Object proxy, Method method, final Object[] args)
    throws Throwable {
  // If the method is a method from Object then defer to normal invocation.
  //Object类方法,直接执行,不需要做额外操作
  if (method.getDeclaringClass() == Object.class) {
    return method.invoke(this, args);
  }

  // Load or create the details cache for the current method.
  final RestMethodInfo methodInfo = getMethodInfo(methodDetailsCache, method);

  //同步方法的处理逻辑,作为Android库的话忽视就可以了
  if (methodInfo.isSynchronous) {
    try {
      return invokeRequest(requestInterceptor, methodInfo, args);
    } catch (RetrofitError error) {
      Throwable newError = errorHandler.handleError(error);
      if (newError == null) {
        throw new IllegalStateException("Error handler returned null for wrapped exception.",
            error);
      }
      throw newError;
    }
  }

  if (httpExecutor == null || callbackExecutor == null) {
    throw new IllegalStateException("Asynchronous invocation requires calling setExecutors.");
  }
  //这个RestMethodInfo类中的类变量,通过你接口中方法定义来确认
  if (methodInfo.isObservable) {
    if (rxSupport == null) {
      if (Platform.HAS_RX_JAVA) {  //和前面hasOkHttpOnClasspath()方法类似,就是找对应的包名
        rxSupport = new RxSupport(httpExecutor, errorHandler, requestInterceptor);
      } else {
        throw new IllegalStateException("Observable method found but no RxJava on classpath.");
      }
    }
    //rxSupport是一个自定义的类,查看这个方法的源码应该可以提升你对任意对象转换成Observable对象的理解
    return rxSupport.createRequestObservable(new RxSupport.Invoker() {
      @Override public ResponseWrapper invoke(RequestInterceptor requestInterceptor) {
        return (ResponseWrapper) invokeRequest(requestInterceptor, methodInfo, args);
      }
    });
  }

  // Apply the interceptor synchronously, recording the interception so we can replay it later.
  // This way we still defer argument serialization to the background thread.
  final RequestInterceptorTape interceptorTape = new RequestInterceptorTape();
  requestInterceptor.intercept(interceptorTape);

  Callback<?> callback = (Callback<?>) args[args.length - 1];
  //线程池执行网络请求,callbackExecutor指定callback执行的线程
  httpExecutor.execute(new CallbackRunnable(callback, callbackExecutor, errorHandler) {
    @Override public ResponseWrapper obtainResponse() {
      return (ResponseWrapper) invokeRequest(interceptorTape, methodInfo, args);
    }
  });
  return null; // Asynchronous methods should have return type of void.
}
不得不说这个代码的注释写的真好,我针对其中的一部分代码写了中文注释。这里invokeRequest()方法很复杂,下面我们来看一下。
RestHandler.invokeRequest()
/**
 * Execute an HTTP request.
 *
 * @return HTTP response object of specified {@code type} or {@code null}.
 * @throws RetrofitError if any error occurs during the HTTP request.
 */
private Object invokeRequest(RequestInterceptor requestInterceptor, RestMethodInfo methodInfo,
    Object[] args) {
  String url = null;
  try {
    methodInfo.init(); // Ensure all relevant method information has been loaded.

    String serverUrl = server.getUrl();
    RequestBuilder requestBuilder = new RequestBuilder(serverUrl, methodInfo, converter);
    //在这个方法内,将你放入该方法中的各个参数处理成http标准格式
    requestBuilder.setArguments(args);
    //给http请求添加额外的信息,这些信息在requestBuilder写好了
    //自己在初始化RestAdapter的时候也可以初始化自己的RequestInterceptor,
    //这样的话就可以为一群http请求添加共同的header也好,参数也好
    requestInterceptor.intercept(requestBuilder);
    //封装了一个HTTP请求所有需要的信息
    Request request = requestBuilder.build();

    ...

    long start = System.nanoTime();
    //使用之前设置的Client.Provider进行网络请求,并得到返回值
    //Response这个类封装了HTTP返回信息
    Response response = clientProvider.get().execute(request);
    long elapsedTime = TimeUnit.NANOSECONDS.toMillis(System.nanoTime() - start);

    int statusCode = response.getStatus();
    //就是指接口中方法的返回值类型
    Type type = methodInfo.responseObjectType;

    if (statusCode >= 200 && statusCode < 300) { // 2XX == successful request
      //我们一般都要Convert之后的格式, 我还没遇到直接需要Response的情况,
      // Caller requested the raw Response object directly.
      if (type.equals(Response.class)) {
        if (!methodInfo.isStreaming) {
          //如果你返回值是Response,并且不返回流,而返回原始类型,
          //response会将服务端返回值写入一个64K大小的数组中,如果返回值很大,那么数据就无法完全储存,所以在这种情况下返回大文件会有问题
          // Read the entire stream and replace with one backed by a byte[].
          response = Utils.readBodyToBytesIfNecessary(response);
        }

        if (methodInfo.isSynchronous) {
          return response;
        }
        return new ResponseWrapper(response, response);
      }
      //这个接口的注释 Binary data with an associated mime type.
      //这个接口用来抽象http的返回值的body
      TypedInput body = response.getBody();
      if (body == null) {
        if (methodInfo.isSynchronous) {
          return null;
        }
        //这个就是callback里的Response和Body
        return new ResponseWrapper(response, null);
      }

      ExceptionCatchingTypedInput wrapped = new ExceptionCatchingTypedInput(body);
      try {
        //调用我们之前定义的Converter来解析数据
        Object convert = converter.fromBody(wrapped, type);
        logResponseBody(body, convert);
        if (methodInfo.isSynchronous) {
          return convert;
        }
        return new ResponseWrapper(response, convert);
      } catch (ConversionException e) {
        ...
      }
    }
    //将body的数据转换成byte数组, http状态码不在200-300之间
    response = Utils.readBodyToBytesIfNecessary(response);
    ...
  }
}
这个方法很长,我去掉了profiler和log以及错误处理相关的内容。
这里首先调用的就是method.init()方法,这个方法:
synchronized void init() {
  if (loaded) return;

  parseMethodAnnotations();
  parseParameters();

  loaded = true;
}
如果执行过,直接从缓存 Map 里拿就可以了,不需要重复执行, 这个方法就是前面说的,获取每个方法对应的注解和方法参数内的注解,并给你的那些方法做合理的替换。
剩下的方法基本都已做了注释,看代码即可了解。再提示一点,有TypedInput,自然有TypedOutput,
TypedOutput的作用就和大家想的一样,是发送出去的数据类型的接口抽象。
提示
在这里进行几点提示:
- 自定义 converter 的时候需要实现
Converter接口,比如你想用其它的 Json 解析库替代 Gson,或者服务端返回值不是 Json,而是 XML 等等。 只要了解了TypedInput和TypedOutput,剩下的很容易就可以完成了。 - Retrofit 这个版本不支持 Multimap,所以如果服务端要求请求的时候 key 一样 value 不一样就很悲剧,那么修改 RequestBuilder 就可以达到 Multimap 的目的。
- Retrofit 这个版本不支持在接口中写入整个 url,如果 endpoint 不一样就要重新创建一个
RestAdapter,但悲剧的是创建一个RestAdapter的代价是很大的, 那么修改 RestMethodInfo 就可以达到在 HTTP 方法注解中使用整个 url 的目的。
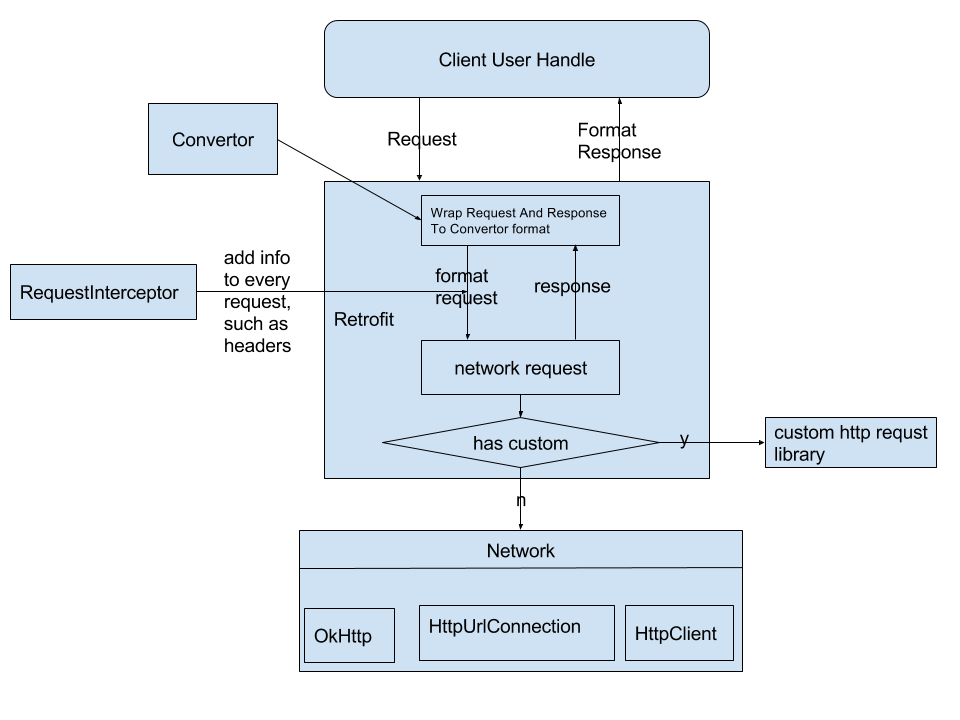
到这里我们对这个库的源码分析就完了,接下来以一副图来结束这个专题。

这样看来,Retrofit 本身就是一个胶水层,同时像插槽一样留出一些插口给大家使用,简化了网络请求。